Popcosmo

BEAUTY

Summer's End and My Ideal Image

BEAUTYKim & Chloe26 Comments
DSC00171.jpg

This is a sponsored post written by me on behalf of Ideal Image. All opinions are 100% mine. I can't believe it's the end of summer! It seems like just yesterday we were packing up the house and planning our big cross-country move. Now that summer's fun and our vacations *sigh* are over, I'm reassessing and doing my annual what needs a fall tune-up: the yard, the kitchen, the office, or...  me?

Vacation 1 photo 2014-08-28_17-06-28.jpeg Vacation2 photo KimampJeff.jpg

I've been taking extra-special care of my skin since moving to Denver. Being outside for just a short time in the "mile-high city" can result in a serious burn and it's always sunny here. All of our activites are outdoors, which I love, and our vacations are especially centered around being outdoors. We bike everywhere, and have been taking long weekends to the mountains. We've been rafting, hiking, exploring and even getting back into running without the benefit of oxygen. Of course I wear my sunscreen and I even try to wear a hat and sunglasses too, but crow's feet and lines are creeping in faster than ever which had me noticing in my very few vacation photos I'm wearing sunglasses to hide the effects. Does anyone else avoid the camera or wear sunglasses? It's time to step in front of the camera & take off the sunglasses!

So I was excited when when Ideal Image contacted me to tell me about their Ideal Image Facial Rejuvenation services. They are offering 25% off Facial Rejuvenation for a limited time. I'd heard of their laser hair removal, and was interested to hear they offered Dysport, Ultherapy and Restylane. Ultherapy tightens and lifts loose skin around the neck and face, like a non-surgical facelift. Right now I'm interested in Restylane, a filler for deep wrinkles, and Dysport to help crow's feet. I still want to look exactly like me, but I guess you could say an "improved version" of me!

And wouldn't you know, this is one of the top 3 reasons people want facial rejuvenation. All 3 reasons are to look younger, have more confidence, and look like yourself, only better. I'm curious if any of these reasons appeal to you. If one (or more) does, click to request more information and let me know.

xo ~kim

Idealimagelogoresized2_zpsca3e048f

Visit Sponsor's Site

3 reasons to try Sephora Color IQ

BEAUTYKim & Chloe17 Comments

I don't wear foundation... but this ad for Sephora Color IQ totally and completely intrigued me to the point of luring me in my local Sephora when I was recently at the mall. I could have my own Pantone color? Who knew! I don't like to buy or wear foundation because I'm not good with colors and am worried that since I can't tell if my makeup matched my skin, I'll be "that lady" walking around with an orange face and a very obvious line at my chin or neck. I'd rather have a few discoloration spots than have on too much makeup. Since I usually purchase a new sunscreen for spring and summer, and my skin is becoming more and more discolored lately, I thought it might be time to start using either a powder with coverage or a tinted moisturizer + sunscreen. I was curious what would be recommended by the Color IQ "test."

Sephora Color IQ

So off I went. I immediately found the Color IQ test at the front of the store and a salesperson who placed a wand against 3 spots on my face and gave me my number - the entire process took about 3 minutes. She emailed me the list so I could do my research at home (without adding me to a marketing list - hurray, no spam!) but also gave me samples.  I'm trying Laura Mercier and so far, I'm very pleased with it.

I'm a 1R07 and a few of my recommendations are:

Sephora Pantone Color IQ

Since both of my kids were with me, we decided to go ahead and test the system a little bit and see if, perhaps, we all ended up with the same Color IQ. We didn't, and I left impressed with the results, and the fact that I can finally know what shade to pick without simply guessing anymore. The Sephora Color IQ system is ingenious and 3 reasons I'd suggest it:

1. No more guessing which shade is closest to your skin color. 2. You can read the reviews for all the colors and brands that are suited to you. 3. You can sample those colors and brands for the perfect match to your needs.

When summer arrives and my skin tone changes, even though I will be wearing sunscreen, I'll go back for another Sephora Color IQ test and see if I need to switch shades. No more worrying about being the lady with the orange line on my face anymore!

xo ~kim

PS: This post is NOT sponsored, I simply wanted to share my experience with you.

Easy Criss-Cross Top Knot

BEAUTYKim & Chloe11 Comments

No time to wash your hair or style it… or just looking for a quick fix? Nothing is more simple than a messy bun or a top knot and we like this criss-cross top knot because it adds a certain je ne sais quoi to the messy vibe. A little yin and yang showing that a bit more effort was put in than just twisting it up into a bun, but it's still fast enough to get you out the door when you're pressed for time, and easy enough that it only takes a few minutes.

wrapped topknot

Directions

  • separate your hair into three equal sections - top for the bun, middle for the 1st wrap, & bottom for the last wrap. the easiest way to do this is to wrap a pony tail holder around each one. you’ll look like a freakazoid at first, but it’ll all be good in the end.
  • take the top section of your hair and twist it into a bun (photo 1). once you’ve twisted all your hair, secure it with a bobby pin. don’t worry about how this part looks, because it’ll eventually be covered up.
  • take a 1" section from the middle section and twist it. once you’ve twisted it, then twist it around the bun. (double twist action going on here!) then secure with a bobby pin.
  • continue to wrap 1" pieces of hair from the middle section around the bun. make sure to leave the bottom sections of hair down.
  • from the bottom section of your hair, divide it in 1/2 (left and right). take half of the hair and wrap it around the opposite side of the bun. this will start to create the “criss-cross” effect that adds a little something special! then take the second section and wrap on the opposite side of the bun. Criss cross complete!

there ya have it! the flawless criss-cross top knot!

xox ~chloe

wrapped topknot

Thanks so much to Michelle Brooks of Headz Inc. of Louisville for working with us to create this great 4-part series!

Michelle Brooks

best wedding photographers in Louisville

Low Ponytail

BEAUTYKim & Chloe9 Comments

  The low ponytail is a classic style that's perfect for just about any occasion. But it's also a lifesaver on those morning when you have to rush out the door. Our tutorial will show you how to add a few twists to the routine to make it seem like you put in a lot more effort than it really requires, giving you a polished hairstyle in minutes.

Low Ponytail how-to

Step 1: Tease hair at the crown. Start with a four inch section at the crown of your head, and back comb to give your pony a nice voluminous look. Take another section behind it and do the same, and repeat one more time. Gently comb the teased sections to smooth them back, but leaving height.

Step 2: Put your hair in a ponytail, but leave out a one inch section from the side or bottom of the ponytail.

Step 3: Wrap the one inch section around your pony tail and secure with a bobby pin or two (it might even take three depending on how thick your hair is). Enjoy your stylish low ponytail.

How to style a simple ponytail


Thanks to Michelle Brooks of Headz Inc. of Louisville!

Michelle Brooks

best louisville wedding photographers

How to style Beachy Waves

BEAUTYKim & Chloe7 Comments

Beachy waves are a hair style that will never go out of style. It’s classic, simple, and give you an effortless look — which is what we strive for as girls! As the weather is beginning to warm up, it’s the perfect time to start channeling your inner mermaid and rocking this beachy vibe. We've shown you how to curl hair with a flat iron, but here's how to use a curling wand and if you want to recreate this look, here's how: Step 1: Secure top half of your hair on top of your head with an alligator clip. In order to achieve an effortless look, diagonally part your hair (view picture for a visual aid).

Step 2: Start with a one inch piece and curl away from your face. Alternate direction of curls  to keep the curl looking natural. Once finished with the bottom part of your hair, then unclip the alligator clip and repeat on top layer of hair.

Tip: do not start the curl at the scalp, but closer to the level of the ear.

That's it… beachy waves are simple to create and easy to wear. Enjoy!

Beachy Waves TutorialBeachy Waves how to

Thanks to Michelle Brooks of Headz Inc. of Louisville!

Michelle Brooks

best louisville wedding photographers

Chignon Twist

BEAUTYKim & Chloe7 Comments

Chignon Twist 
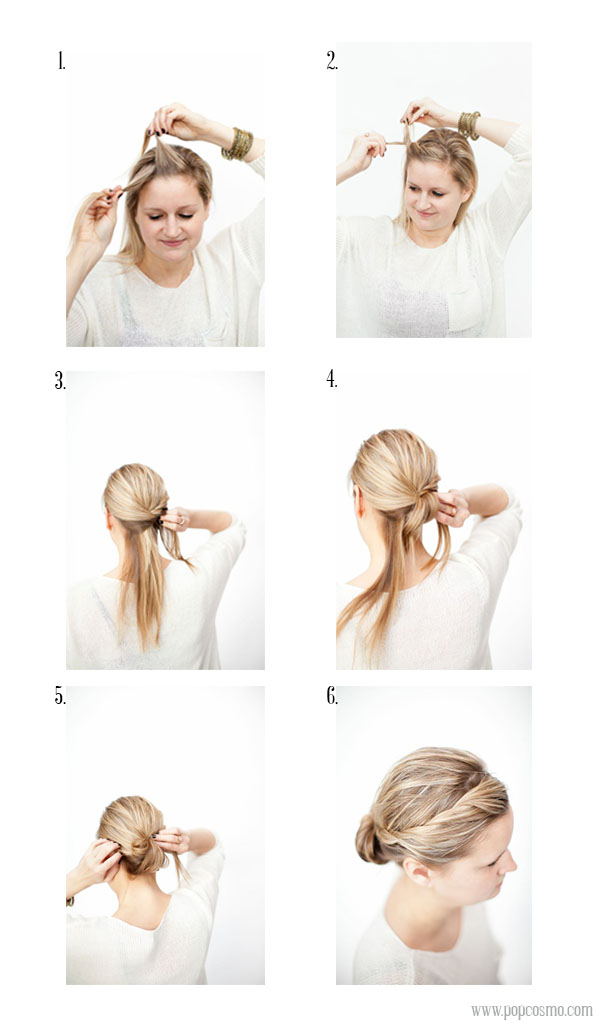
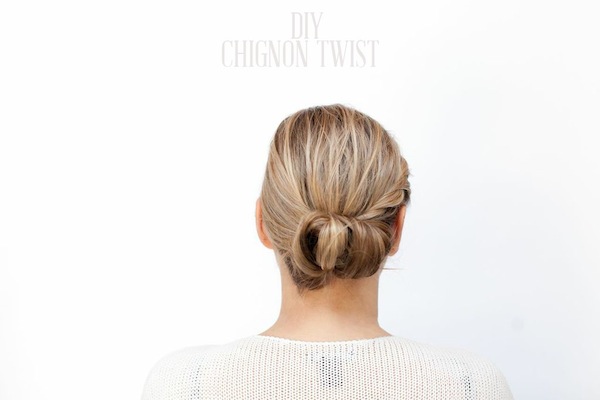
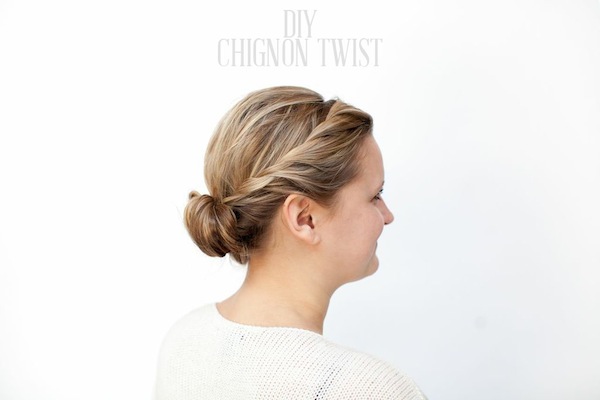
How stunning is this up-do? It’s perfect for a night out on the town or even an interview. Not only is this chignon fit for any occasion, but it’s super simple to do and can either be casual and dressy.

Here’s what you do to get the look:

Step 1: Pick up two 1" pieces of hair right at the front of your head. Use your natural part as a guide to know where to pick up the first piece.

Step 2: French braid your hair with two pieces aka do a two strand twist. All you do is take the front piece and wrap it to the back and drop the new piece that is now in front.  Switch hands. Pick up the dropped hair plus some more in front and wrap it back over the hair you are holding while moving the back piece to the front and dropping it. Switch hand and continue.  Sound confusing? Check out this video for a two-strand twist. {<-- Click}

Step 3: Once you’ve twisted your hair to the very back of your head,  pin the twist so it stays in place and place hair in a ponytail.

Step 3: Roll hair upwards until the desired chignon shape is achieved and use bobby pins to secure in place. (Tip: the longer the hair, the more bobby pins to accomplish.)

Woohoo!! You’ve accomplished the look!

Chignon Twist Tutorial


How to style a Chignon Twist

A very special thanks to Michelle Brooks at Headz Inc. in Louisville. Check her out for fabulous cuts and styles!

Headz Michelle Brooks


Headz

best wedding photographers in Louisville

best louisville wedding photographers