Popcosmo

RECIPES

Energy Bites

DIY, EXTRAS, RECIPESKim & Chloe2 Comments

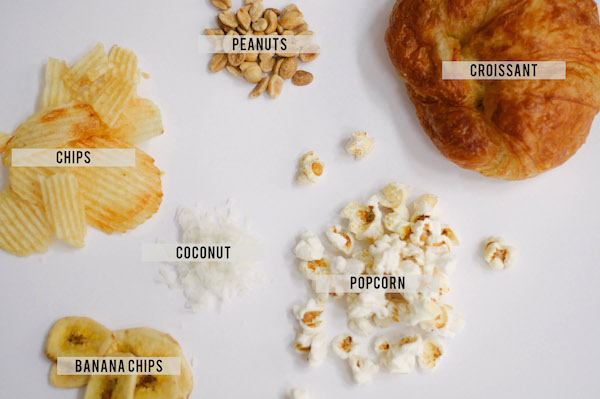
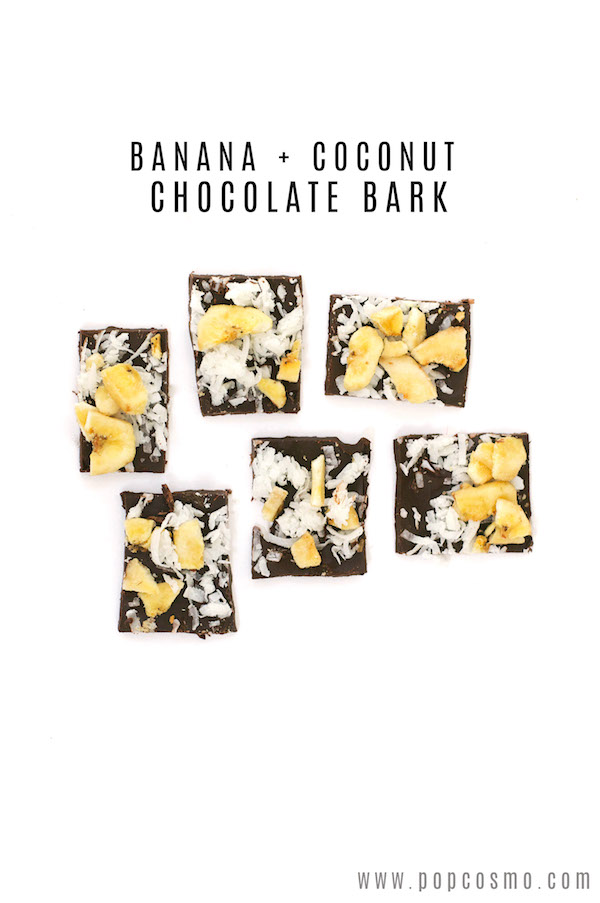
So, before I get into the real post, I just want to mention that a ton of people found out about my blog at school. It seemed like all of a sudden people were mentioning that they liked my blog or had seen my blog, and it was kind of weird at first. It’s not that I didn’t want people at school to know that I have an “internet life,” it’s just that it felt kind of separate. I’m not any different on my blog than I am in real life, but I do think of my blogging self as a whole different part of me. Anyway, I guess what I’m trying to say is that if you have a hobby or extracurricular activity that you’re passionate about, don’t worry if people find out about it. It’s who you are and it’s a part of you, regardless of what other people think about it. And, if you happen to be from school and you’re reading this… lemme know (;Ok, sorry, moving on to the real post now...

One of my friends from school brought some peanut butter balls to swim practice and she let me have one. Not only was it absolutely amazingly tasty, but it was the perfect snack to have right before a workout. She told me that she found the recipe on Pinterest so I did some digging and found it myself. I didn’t have all of the ingredients on hand so I kind of changed it around a little bit and I happened to really like the way they turned out! Here’s what I did, but if you want the real recipe to make these energy bites, click here.
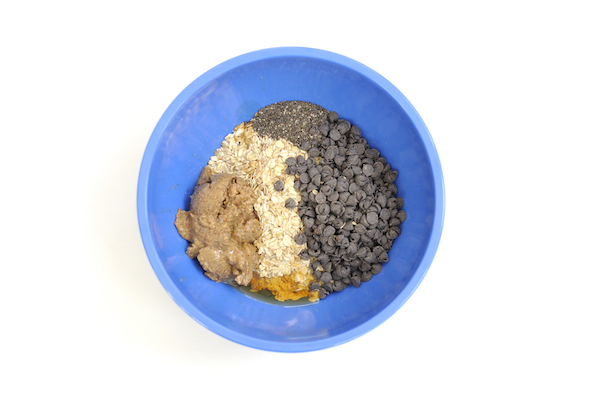
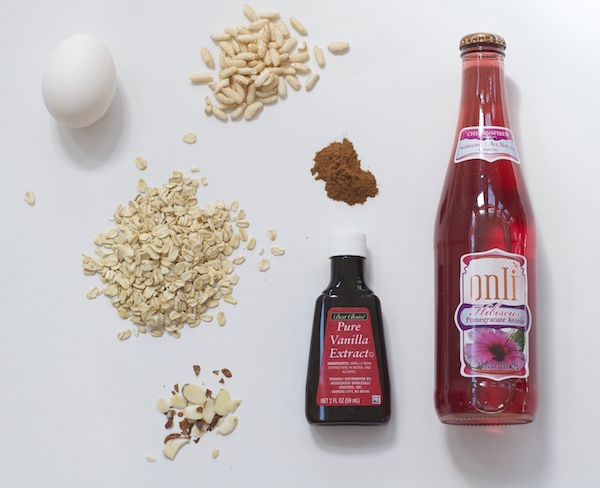
ingredients - energy bites no bake | energy bites No Bake Energy Balls energy bites

Ingredients:

1 cup of dry oatmeal (old-fashioned oats) 3/4 peanut butter (I tried almond butter, but it wasn’t sticky enough) 1/2 cup chocolate chips 1/3 cup honey 2 table spoons chia seeds 1 teaspoon vanilla extract

Directions:

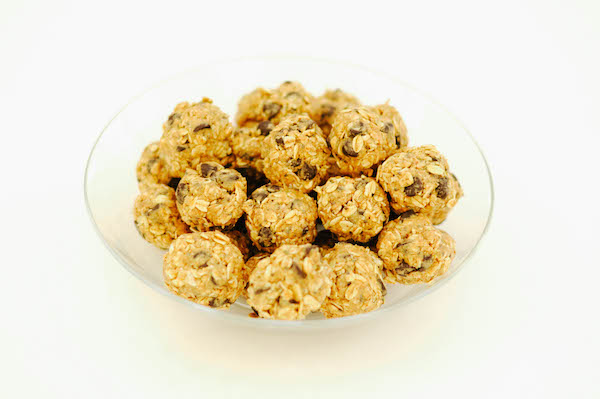
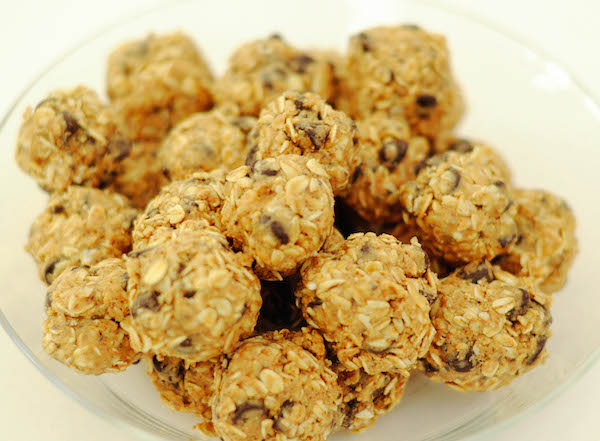
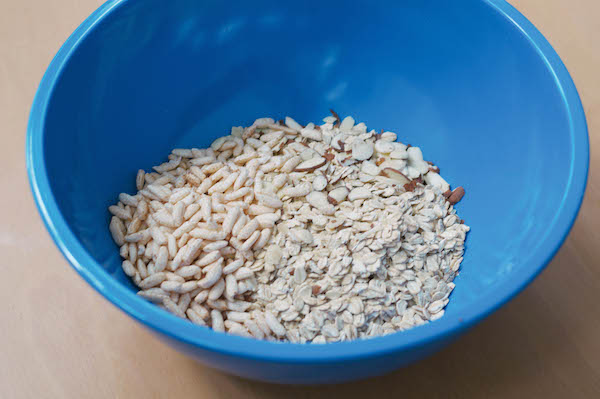
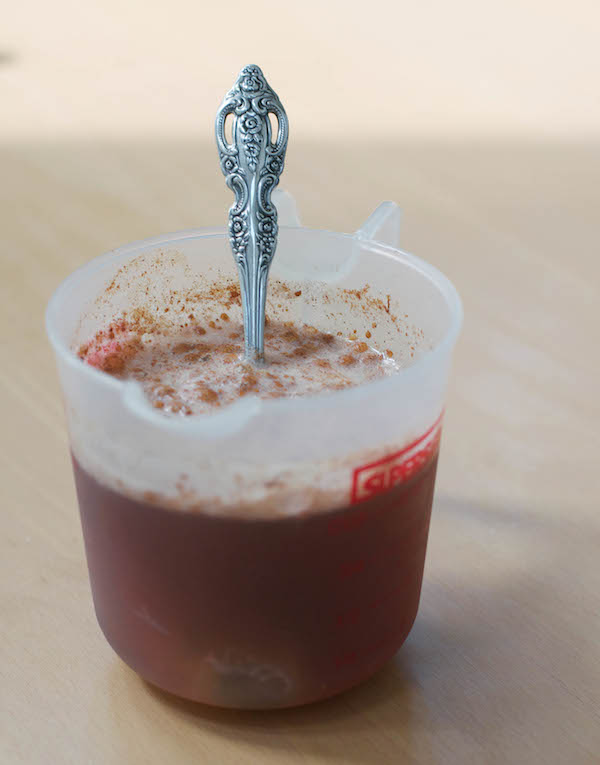
1. Pour everything in a bowl and mix it together. I found that using my hands to mix was much easer than using a spoon or whisk. 2. Put the mixed bowl into the fridge for at least half an hour 3. Roll into balls about 1” in diameter (or however big/small you want them)

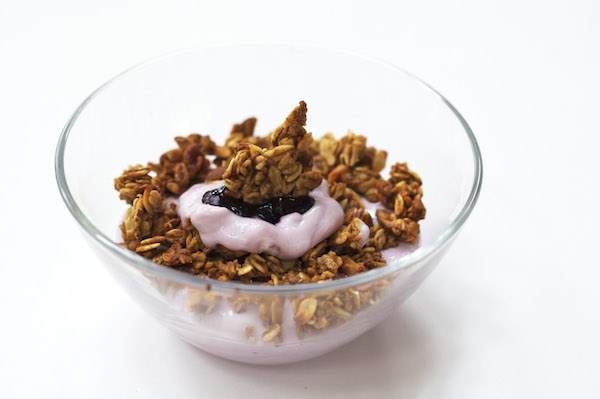
Seriously, that’s it. These energy bites are so simple to make and so easy too! If you make them be sure to post a picture on Instagram or Twitter and tag us so I can see!

xox, Chloe

Starbuck's Pumpkin Spice Latte Recipe Hack: Taste Test

EXTRAS, RECIPESKim & Chloe7 Comments

It's that time of year again: leaves are falling, sweaters are being pulled out of hiding, a fire or two has already been lit, and we are craving a Starbuck's Pumpkin Spice Latte (or PSL, as it's affectionately known). But hearing how it's mostly syrup and has a whopping calorie count had us ready to make our own in our brand new Keurig 2.0 we were recently sent by the sweet Keurig folks. But finding a zillion Starbuck's Pumpkin Spice Latte recipe ideas already out there, Chloe and I got smart and decided to put those recipes to our (ahem) expert and very subjective PSL taste test. And the smell of them cooking even lured brother/son out to help us - yes, we had fun!

Starbuck's Pumpkin Spice Latte Taste Test | Popcosmo.com

Keurig + pumpkin spice latte recipes

who has the best pumpkin spice lattes? | popcosmo the best pumpkin spiced lattes

We scored each recipe on a scale of 1-5, with 1 being the lowest, for ease, cost, availability of ingredients, healthiness. The category for taste comparison to Starbuck's PSL was out of 10 since taste is the most important factor, after all. Once we devised our scoring and gathered our ingredients, we settled in for a hard day's work of sipping lattés... just for you. #WeLoveBlogging  Chloe tasted and tasted and tasted some more!

52 Kitchen Adventures SCORE = 19 ease: 5 cost: 4 ingredients: 3 healthiness: 3 taste: 4 Thick, a little chunky, and frothy. Would be better with whipped cream, but the flavor is perfection. Beware, pumpkin sludge might be at the bottom of your cup... a little gross.

The Kitchn SCORE= 21 ease: 4 cost: 2 ingredients: 2 healthiness: 3 taste: 10 We wish the directions were more specific, but the result was beyond amazing. The tastes reminds me of marshmallows on top of a pumpin pie and I would drink this for breakfast, lunch, and dinner.

Eating Bird Food SCORE= 17 ease: 4 cost: 3 ingredients: 2 healthiness: 5 taste: 3 Too bitter but thinness was on point. The flavor is just a little too sharp for me.

The Original Starbucks PSL  SCORE=17 ease: 4 cost: 0 ingredients: 5 healthiness: 0 taste: 8 I know, weird that the original is only an 8. But it is what it is. The original sort of tastes like drinking a hot pumpkin smoothie to me, and now that I've made some at home, I've learned that I like being able to tweak my PSL how I want it.

And the winner was: The Kitchn Pumpkin Spice Latte recipe, and to be honest, it looks like I can save tons of calories and $$ this fall. Thanks to our Keurig 2.0, we can easily make the recipe for 1 or for 10 with the new pod system. Guess whose house is going to be smelling like a Starbucks Pumpkin Spice Latte this fall? My brother is definitely happy!

  @popcosmo on Instagram

Homemade Hibiscus Pomegranate Granola

EXTRAS, RECIPESKim & Chloe7 Comments

Onli Homemade Granola As you might have noticed, we’ve been posting a lot of recipes lately! I don’t know if it’s just that we have a better kitchen in our new house in Denver, or if I’ve just been enjoying making my own food over going out. Whatever it is, I’m loving it. Onli Beverages was nice enough to send me a few drinks to try out and I decided to get creative with it. With my cousin Aly visiting, we made Onli flavored granola. Seriously? Yes, and this homemade granola is beyond delicious.

Ingredients:

2 1/2 cups of oats 1 cup puffed rice 1/4 cup sliced almonds (or other nuts) 6-8 ounces of Onli Hibiscus Pomegranate Aronia 1 egg white 1/2 teaspoon vanilla extract 1-1/2 teaspoons cinnamon 2 tablespoons honey (add more for sweeter granola) 1/4 teaspoon salt

Directions:

Preheat your oven to 350 degrees. Mix the oats, puffed rice, and almonds in a bowl. Mix everything else in another bowl. Then combine the two bowls into one. Stir it all until the liquid is absorbed. (You might need to add more oats or puffed rice to help) Lay all the granola on a cookie sheet covered with parchment paper. Put your granola in the oven for 15 minutes, then stir and put it back in for another 15 minutes. (If you want it to be super crunchy, then you can put it in for longer).

Homemade Granola Ingredients Homemade Granola Homemade Granola | PopCosmo   Granola Recipe granola how to make granola | PopCosmo

This should make a batch for about three people so feel free to double or triple the recipe. We ate ours over yogurt and we've learned that we need to keep a constant supply on hand. Onli has a ton of flavors so we definitely want to experiment with the rest of them! If you try this recipe out be sure to tag us (@popcosmo) and @ONLIbeverages in the picture! We might be biased, but we think it's the best homemade granola you'll ever eat!

xox, Chloe

Avocado Toast Recipe

EXTRAS, RECIPESKim & Chloe17 Comments

I definitely wouldn’t consider myself  “trendy” in fashion, but when it comes to food that’s a whole different story. I like trendy food. It’s always fun and most of the time it tastes good and that’s all I can ask for when it comes to what I eat. When I was in New York City the hottest food was (is?) avocado toast. It was on every menu and popped up on my Instagram feed more times than I can count. My cousins and I decided to make it one weekend and I swear we ate so much of it that we weren’t hungry until the next day. It was that good. Actually, it was that amazing. Delicious, impeccable, flawless, etc. avocado toast recipe Avocado toast is a little bit of heaven spread on a piece of bread.

And here’s the perfect avocado toast recipe:

  • Slice two avocados and mash them in a bowl (we liked ours a little chunky but mash until you like the consistency).
  • Immediately add lime juice to your mashed ‘cado. This makes it taste amazing and keeps it from turning brown and gross.
  • Add salt, pepper, and red chili flakes to taste.
  • Toast a piece of bread (we used our gorgeous, fast, and no more "knife to get the bread out" Magimix toaster) -- I <3 my toaster. Seriously.)
  • Spread the ‘cado mixture on a piece of toast and add more chili flakes to the top

And there ya have it. Five simple steps to make the best toast ever. Avocado toast recipe

how to make avodaco toast Clear Magimix Toaster

Magimix Toaster

Life is better with clear toasters. I mean seriously, how cool is this Magimix toaster?!avocado toast

Let us know if you recreate this avocado toast recipe, and we’d love to see your pictures! Tag us on social media (@popcosmo)! xox Chloe

Chocolate Bark Recipe

EXTRAS, RECIPESKim & Chloe9 Comments
COVERPHOTO.jpg

I have this problem where I want to be healthy when it comes to food, but then I see chocolate and I eat it. It’s like my brain doesn’t work with me. But who am I kidding, chocolate is worth it. And this chocolate bark recipe? Yeah, it’s more than worth it. My brother and I always cook when we are bored and we decided to create our own chocolate bark combinations earlier this week after seeing some drool worthy combinations in the chocolate aisle of our grocery store. We had some crazy ideas in mind (think seaweed) but we decided to keep the combinations rather simple. And they’re all beyond amazing I might add.Here are the combinations we went for, but you can seriously add anything you want. That’s the beauty of this recipe. -Croissant Crumbs (try saying that in a French accent) -Peanuts and Banana Chips (Chocolate Chimp) -Popcorn (kettle corn would also be amazing) -Banana and Coconut (a tropical sweet) -Potato Chips (the perfect salty + sweet combo)

DIY Chocolate Bark

DIY chocolate bark ingredients


bananacoconut

banana peanut chocolate bark

potato chip bark

croissant chocolate bark


popcorn chocolate bark

Here’s what you do. It’s painfully easy.

  1. Melt a whole bunch of chocolate chips. We melted ours over a pot of boiling water so that we could make sure they didn't burn.
  2. Cover a cookie sheet with wax paper and then pour your melted chocolate onto the baking sheet.
  3. Evenly spread all your chocolate.
  4. Add toppings as desired. We placed ours in strips but you can create any pattern you want.
  5. Stick your chocolate in the fridge until it’s hard.
  6. EAT. (the best part)

I’d say the whole process takes about 30 minutes (not including the chocolate drying in the fridge.) It’s easy and delicious. A killer combo in my book.

If you make chocolate bark then we want to see! Tag us in any pictures that you post (@popcosmo).


xox, Chloe

Apple, Brie, and Arugula Toast

EXTRAS, RECIPESKim & Chloe5 Comments
TOAST.jpg

I’m obsessed with cheese. It’s starting to become a problem.  When I order food at an Italian restaurant I always ask for parmesan cheese with a side of pasta. I don’t order “chips and queso” I order “queso and chips.” The first aisle I walk down in Costco is the cheese aisle because it’s simply the best. Embarrassingly enough, I sprinkle a little cheese on everything I eat; watermelon and feta do taste amazing together, I swear. Ever since I discovered brie though, I’ve realized that no other cheese compares. It’s creamy, it’s flavorful, and it tastes good for breakfast, snacks, lunch, appetizers and dinner. It’s just the perfect cheese. My mouth is literally watering as I type about it.

A few years ago I discovered the apple + brie combo and I can honestly say that it’s the best food combo to ever be invented. It’s better than chips and salsa, milkshakes and french fries, and cream cheese and lox. No exaggeration. Then, just recently, I realized that slapping the apple and brie onto a perfectly toasted piece of bread and adding a few pieces of arugula would be the best of the best. Apple, brie, and arugula toast is amazing. It is, it really is. I gobbled up the piece of toast pictured below like a caveman who walked the entire Bering Land Bridge without eating (that's probably impossible, but it made for a good simile).

So if you’re feeling a little hungry, you just want to make an amazing piece of toast, you want to show off your gourmet lunch to your friends at school, or you want to impress a family member with your mad cooking skills then stop reading this (after you comment, that is) and go do it. I promise you won’t regret it. Actually, you probably will regret it because you will want to make an entire loaf of bread’s worth. But it’s totally worth it. I'm not exaggerating when I say that apple, brie, and arugula toast is the best of the best.

All you have to do is slice an apple, slice some brie, and place a little bit (or a lot a bit, depending on your taste buds) of arugula on a perfectly toasted piece of bread. It's that simple. Dangerously simple as I like to say.

apple brie and arugula toast

apple/brie/arugula toast ingredients

magimix clear toaster

How sick is this clear Magimix toaster (c/o) that we used? I swear it makes the perfect golden brown piece of toast. Every. Darn. Time. And you can see through it. Plus (yeah there are more perks...) the toast pops up high enough that you don't have to worry about burnt finger tips.

apple_brie_arugula_toast

apple brie toast

apple, brie, arugula toast

If you do make this toast then be sure to post a picture of it and tag us (@popcosmo)!! We really want to see your creations!!

xox Chloe

Raw Chocolate Pudding Recipe

EXTRAS, RECIPESKim & Chloe8 Comments
raw-chocolate-pudding.jpg

I’ve always been a fan of trying new and weird foods. Raw oysters? Yep, tried ‘em when I was 7 and fell in looove. Ranch dressing on pizza? Oh yeah, love it. Chocolate avocado ice cream? Yes, and ate the whole bowl. I loved the chocolate avocado ice cream so much that I knew I had to figure out how to recreate it so that I could make it in the comfort of my own home and not have to pay for overpriced presentation. raw chocolate pudding When I stumbled upon a raw chocolate pudding recipe made with avocados from the new site Mother Magazine I knew I had to try it. So I did; although I did change up the recipe just a tad to fit my taste buds. It’s seriously gold, easy to make, and you’ll never want a chocolate pudding cup from the refrigerated section again. Like never ever ever.

Here’s how you make it…

ingredients for raw chocolate puddingIngredients:

2 large avocados 3/4 cup agave (or maple syrup) 1/2 cup cocoa powder 3 tablespoons coconut oil 1/2 teaspoon balsamic vinegar 1/2 teaspoon salt

Directions:

Put all your ingredients in a blender and blend until smooth. {It's really that easy, but I hand mixed the ingredients together first so that the blender could do it’s job better.}

The best part about this recipe is that it’s raw chocolate pudding. That means that you aren’t putting unnecessary gross things into your body, plus you’ll fill up faster because raw foods are awesome like that. This recipe make about 2 servings worth of normal pudding, but you could most likely share it with about four people because it’s so filling.

If you try this recipe, be sure to Tweet / Instagram a picture (and tag us) so that we can see your awesome chocolate pudding!

xox ~chloe

chocolate pudding with avocado

The World's Best Bourbon Slush Recipe

EXTRAS, RECIPESKim & Chloe1 Comment

I'm not exaggerating when I say I'm about to share with you the recipe for the world's best bourbon slush: a mint julep slush. I hadn't even heard of a bourbon slush until this week when Chloe and I were hanging out with Christy and Missy making cute Derby fascinators and bow-ties... you know, the sort of thing you do around Kentucky Derby time in Louisville. Christy, of The Bourbon Blush and definitely in-the-know about all things bourbon, shared her morning of Derby routine, which of course included her sought after sweet tea bourbon slushy recipe. Not being a bourbon drinker until recently (I found one I love!) I was curious. So we chatted bourbon, slushies and Feast BBQ while pinning, gluing, and playing with feathers.

Feast BBQ is well-known around Louisville for having fabulous, sinful Bourbon Slushies (known as Bourbon Slush, Bourbon slushy, and Bourbon slushies - take your pick of spellings). They might possibly be the "best in the world," and this little secret is spreading like wildfire. The type of slushies rotates year round (Frozen Mexican Hot Chocolate with Bourbon Slushy anyone?) and in April the slushy was, fittingly, a Mint Julep Slushy in honor of  the Kentucky Derby. The recipe was published by Gilt so I whipped it up in no time at all, tasted and mmmm, delish!  Make up a batch of these slushies and I can pretty much guarantee that your guests will all be asking for the recipe. And the wildfire will keep spreading.

Mint Julep Slush Recipe

  • 4 oz. Bourbon
  • 6 oz. ice
  • 6 oz. brown sugar simple syrup (combine equal parts (1:1) sugar and water in a bottle and shake vigorously until sugar is completely dissolved)
  • 2-3 dashes of Fee Brothers Min & Whiskey Barrel Aged Bitters
  • Fresh Mint

1. Rub the inside of a glass with the mint. Typically Mint Juleps are served in silver julep cups, but these might more fitting in mason jars.

2. Blend everything together except for the mint.

3. Pour your slushy and garnish with mint and a straw.

And while we're talking Bourbon recipes, if you need something to snack on why not try Maker’s Mark Mint Julep cookies that are served right at the distillery.

Maker’s Mark Mint Julep Cookie Recipe 

Cookie:

  • 2 sticks butter, softened
  • 2 cups light brown sugar
  • 2 eggs
  • 3 cups all purpose flour
  • 1 teaspoon baking soda
  • 1/2 teaspoon salt
  • 1 cup finely ground oats
  • 2 cups Andes Mint Chocolate Candy pieces

Preheat oven to 350 degrees. Cream butter, sugar and eggs until smooth. In a separate bowl, mix flour, oats, baking soda, salt, and mint chocolate candy pieces. Gradually add to butter mixture until incorporated. Scoop out with a two ounce scoop and place 2 inches apart on baking sheet. Bake for 12 to 15 minutes. Allow to cool and add bourbon fudge topping.

Bourbon Fudge Topping:

  • 2 cups melted chocolate chips (milk chocolate or semisweet, whichever you prefer)
  • 1 can sweetened condensed milk
  • 1/4 to 1/2 cup Maker's Mark Bourbon

Melt chocolate in double boiler, remove from stove. Add sweetened condensed milk and bourbon and mix until incorporated. Top cooled cookies with warm fudge and enjoy.

Mint Julep Slush and Maker's Mark Mint Julep cookies seem like the perfect way to have Derby day anytime! Enjoy!

Milk & Cookie Shot Recipe

DIY, EXTRAS, RECIPESKim & Chloe7 Comments
diycookieshots.jpg

The rage with cronuts by Dominique Ansel's Bakery are are being followed up by his hugely popular milk and cookie shot. Recreating his cookie shot is right up there at the top of our list of favorite recipe posts (along with how to make glitter lollipops and the best cake pops) we've brought y'all, because somebody (us!) had to taste test every single chocolate chip shot to make sure it was up to par. And we now have a signature dessert to bring to book club, Kentucky Derby parties, wedding showers, well… just about any party. And clean up is a snap: just down the milk and eat the shot glass. Couldn't be easier. Although there are a variety of recipes we tested, we're sharing our winner: the most simple one that didn't leak and didn't involve an extra layer of glaze to seal the cookie. (But there are glazes below.)

DIY Milk & Cookie Shots

Ingredients: chocolate chip cookie mix mini popover pan tinfoil corks shot glass flour milk

ingredients for cookie shots

Directions: Follow the directions of your cookie mix or use your own chocolate chip cookie recipe. However, add flour to your mix after you have completely mixed yours together. We added between 1/4 - 1/2 cup to ours in order to create a dense cookie mix. Then mix in the flour.

cookie mix for cookie shots

Roll out some of the dough about 1/4" thick and use the shot glass to cut circles. Place the circles on the bottom of each popover mold.

cut circles for cookie shots

Take pieces of dough and roll into a ball, then a log shape, then flatten and place in a the popover mold being certain to attach it to the circle on the bottom so that no milk will leak through the seam. You'll see that our cookie shots are rather thick. This is intentional! They are thick and dense (and yummy!) and why no glaze is required.

rolling dough

Take your cork and roll it in tinfoil, then place it in the center of each cookie shot. This will prevent the cookie shot from falling into the center.

corks for cookie shots

Bake until brown, or like us - the maximum time suggested, and let cool.

chocolate chip cookie shot

If you would rather have a thinner "shot" wall, then you might need a glaze. Whichever you choose, be sure to coat the inside of the "shot" well so that there are no cracks and pour off any excess. You can use:

  • dark chocolate and melt it. Pour and coat bottom and sides, then chill.
  • magic shell for ice cream. Coat all sides and bottom, let harden
  • confectioner's glaze: a little bit of confectioner's sugar + a small amount milk + vanilla. It should have the consistency of thick paint. Paint it on the inside with a clean paintbrush. Chill overnight, then bake for 5 minutes (so you might want to initially bake your shot for the minimum amount of time or until just barely brown).

Add milk (or kahlua or...) and enjoy!

FYI:  we let our chocolate chip cookie shot hold milk for 4 hours in the refrigerator for the sake of testing. We couldn't wait any longer in our taste testing gorge-fest to see how long these would last. They were far and away the best cookie shot glass recipe we made: no leaks, fabulous consistency & no need for a glaze. Plus, we realized that if the milk sits a while, it makes them taste like chocolate chip cookie cake. Yum.

Enjoy and let us know how your shots taste!

Cupcake Toppers

DIY, EXTRAS, RECIPESKim & Chloe7 Comments
cupcake-toppers-copy.jpg

cupcake toppers Cupcakes are the cutest of desserts: a mini cake that you don’t have to share. Because when it comes to dessert, sharing isn’t fun, it’s stealing. One thing I love seeing lately are cake toppers. They are such a cute way to add a little extra something special to a cake. A cherry on top, if you will.

However, I haven’t really been seeing anything that goes on top of cupcakes. I mean there are those cheap plastic rings that grocery stores put on top of their cupcakes, but those don’t really count. So I thought to myself, “wouldn’t it be fun to make a little something for the top of cupcakes.” And because this thought seemed rather rational compared to my other ones (ie “is a banana still edible if you spray paint the outer peel and then eat the inside?” or “if the sun was black would the sky be black or just a darker blue?”) I decided that I should make a few cupcake toppers!

cupcake topper DIY

The star is a classic shape, & when you make the star gold you can channel your inner Rachel Berry, from Glee, because she puts a gold star on everything she likes. Plus, I’m assuming she likes cupcakes, so we’re actually just helping the Rachel Berry cause. I also thought we could get more intricate and make a trendy leaf heart shape.

And aren’t these cupcakes just absolutely gorgeous? We partnered on this post with our fab friend Hunter, of Vivian & Me, who writes a blog about allergy-friendly food recipes. I can not wait to try out these insanely gorgeous basil infused pink grapefruit cupcakes that have a vegan buttercream frosting and candied grapefruit on top! So be sure to stop by her blog for the cupcake recipe &  more amazing, mouthwatering, insanely yummy recipes (buffalo chicken dip, anyone?). And tell her we said "hi!"

Grapefruit-Cupcakes

Directions for toppers:

With the brand new, awesome Cricut Explore (it's on sale right now!): 1. Insert a picture of a star to your Cricut Design Space (we drew our own in Photoshop so it would look kind of rustic and imperfect). If you would like to create our heart & leaf shape, we’ve attached the file below so that you can upload it to your Design Space 2. Print it out on your paper of choice - of course we chose glittery gold! 3. Hot glue the shape to a toothpick 4. Let it dry 5. Then decorate your cupcake until it looks like a masterpiece - maybe Hunter at Vivian & Me has some tips on piping icing that we'll share soon ;)

xo ~chloe

Cricut leaf heart


cupcake topper

Candy Lollipops, Part 2

DIY, EXTRAS, RECIPESKim & Chloe3 Comments

candy lollipops

We're back with more lollipop ideas! We had so much fun making glitter lollipops, that we decided to get even sweeter this time around with candy lollipops. They're easy to make (see the recipe here) and you just add in the candy you like - so we chose red hots and candy hearts for Valentine's Day. This time around we decided to use  candy molds which gave our lollipops the perfect round shape. Our friend, and newbie blogger Christy at The Bourbon Blush {be sure and show her some love} lent us her candy molds, but you can find them here: balloon sucker molds or round sucker molds.

Have fun cooking up a sweet treat and enjoy your candy lollipops!

making candy lollipops


http://popcosmo.com/wp-content/uploads/2014/01/hearts- .jpg

Glitter Lollipops, Part 1

DIY, EXTRAS, RECIPESKim & Chloe22 Comments
DIY-Glitter-Pops-w-pc.jpg

DIY Glitter Pops

As a lover of all things Etsy, all things gold, and anything glittery that doesn't make a mess, it was true love when I discovered Sweet Caroline Confections glitter lollipops. Of course, the first thing that popped in my head was, "I could make those!" Typically, you know the drill, about 50% of our DIYs never make the pages of our blog, but make good stories for Chloe and I to laugh about… later. Once we get over the frustration of having tried to recreate something. But these glitter lollipops are fun and easy to make, and color customizable like our Marshmallow Pops.

Even if our Glitter Lollipops aren't the perfectly round, clear perfection we saw on Etsy, ours are perfect for Valentine's Day (or just change the glitter color and customize them for any occasion, from weddings to prom parties to baby showers, reveal parties, and bar mitzvahs). The possibilities are endless, which is what we adore about the this glittery confection, besides the fact that it only has a few ingredients and is simple to make once you master the technique of the what I prefer to call the "slow pour."  So let's get started!

Glitter Lollipops

Ingredients:

2 cups white sugar 2/3 cup light Karo corn syrup 1/4 cup water edible glitter of your choice {you will also need lollipop sticks, a candy thermometer, and a bowl partially filled with ice water set aside}

Directions:

1. Prepare your work area since it is important that once your candy has finished cooking you can work quickly:

a. If you have granite or marble countertops, lay parchment paper directly on them in long strips. We found this the best method to work quickly. If not, then use cookie sheets lined with parchment paper. (Note: we tried using Silpat, but ended up with a pattern on our lollipops from the sheets. Yours may not make a pattern, so feel free to try it!)

b. Sprinkle your glitter in 3" circles about 3" apart in 2 rows so that lollipop sticks can face in opposite directions and lay completely flat. If you are using candy, then you can place candy into the lollipops after pouring.

2. Place sugar, corn syrup and water in a saucepan with a pouring spout. Stir until the sugar is dissolved while bringing to a boil.

3. Once boiling, place your candy thermometer in the pot and use a pastry brush to wash down the sides so crystals don't form.  Do not stir, but boil until mixture registers 300 degrees to 310 degrees (hard-crack stage) on a candy thermometer, about 5 - 7 minutes.

4. Remove from heat and set in the bowl partially filled with ice water for 15 seconds. It will steam loudly! You want most of the air bubbles to be gone, but don't want the mixture to cool off to much because then it won't pour well - and it cools very quickly!

5. Pour very slowly in the middle of each glitter circle until a circle is formed and press in lollipop sticks. Let sit until completely cooled.

How to Make Glitter Pops - step 5

DIY Glitter Lollipops

Note: I did re-warm the syrup over the lowest heat to soften it slightly when it began to harden. Also, clean-up is easy if you soak everything in very hot soapy water.

Recipe adapted from MarthaStewart.com 

And, if you noticed the title, it says Part 1, so yep, we had so much fun making these, that we'll be back for more ideas after we order a few supplies (hint-hint) for more Glitter Lollipop goodness!

xox, Kim

IF YOU ENJOY THIS: check out our Calligraphy Made Easy & Drink Stirrers


Golden Homemade Oreos

EXTRAS, RECIPESKim & Chloe9 Comments

How to make Oreos
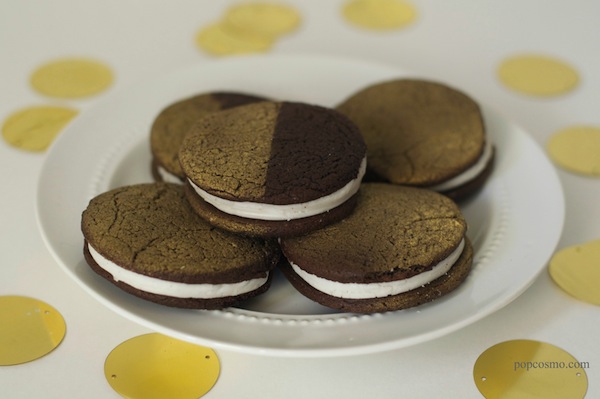
Nothing says kick back and settle in for the holidays than your favorite homemade recipe. And ours is a newfound favorite of an old, old love: Oreos! Who doesn't love to dunk an Oreo while watching a football game or hanging out with family, or twist off and scrape the inside filling? Even the most dessert-resistant among us, ahem, my Mom, can't resist an oreo {or 5} in a package. My brother & I decided to not only make our own, but to create the most irresistible version of homemade Oreos ever... and we think we did (we created 3 batches and taste tested each one)! Plus, you know how much I like gilding just about anything that isn't nailed down lately, so I bet you're not surprised that we've created Golden Homemade Oreos for the holidays! They are not only perfect for Hanukah, we think they are perfect for Thanksgiving, Christmas, New Years... well, you get the idea. Just don't count on them sticking around for long, especially if my Mom is around.

i love homemade oreos

Golden Homemade Oreos Recipe

Cookie: One box 16.5 to 19-ounce chocolate fudge cake mix 1/3 cup water 2 to 4 Tbsp shortening gold food color spray - we used Wilton Color Mist

Filling: 3-1/2 cups powdered sugar 1/2 Tbsp granulated sugar 1/2 tsp vanilla extract 1/2 cup shortening 4 Tbsp hot water

golden desserts

Instructions: 

1. Preheat oven to 325 degrees.

2. Blend all the cookie ingredients with an electric mixer, then knead with your hands until it reaches the consistency of dough.

3. Roll the dough until it's a bit thicker than Oreo cookie thin (since they will thin out when cooking) and use a round cookie cutter to cut circles (we used a bottle cap). Place cookies 1/2" apart on greased cookie sheets. Bake for 4-6 minutes, or until as firm as you want (shorter for chewy, longer for crunchy).

4. Let cookies cool while you work on the filling.

5. Combine filling ingredients in an electric mixer and then mix with your hands until fully combined.

6. Once well combined, form balls about 1/2" - to 3/4" in diameter.

7. Place the filling ball in the center of the flat side of a cooled cookie and press with the flat side of another cookie until the filling spreads to the edge.

8. Take a piece of Glad Press & Seal and wrap tightly around the cookie and spray to achieve a 1/2 gold - 1/2 black cookie. To create an all gold cookie, just lightly spray your cookie. You could easily use cutouts and place them on the cookie held in place with some icing to create all sorts of shapes, but we like simple geometric boldness in our cookies!

The amount of cookies will depend on the size of your cookie cutter. Our homemade Oreos were about 2" in diameter and made approximately 15-20 cookies.

Recipe adapted from More Top Secret Recipes by Todd Wilbur


And it's time again for our Holiday Extravaganza with our Fall Friends. Check out what some of our crafty blog friends have created this week for the fall & holidays and you might want to check in each Monday for more inspiration.

DIY dinner napkins on popcosmo

DIY Dinner napkins by Pink When

 Thanksgiving ideas | popcosmo

Thanksgiving conversation starter game (free printable) on The Pinning Mama

fall pillow makeoverFall pillow makeover on Sews N Bows

paper flower wreath

DIY Paper Flower Wreath by Fresh Idea Studio

http://popcosmo.com/wp-content/uploads/2013/10/OREOS-labelled .jpg

White Chocolate Peach Scones

All, EXTRAS, RECIPESKim & Chloe11 Comments
White-Chocolate-Peach-Scones-4.jpg

Another recipe from Kayla: Summer is pretty much over, which means a few things. First, there are a lot of peaches and secondly, school started. I decided to make the best of it and make a delicious breakfast before school using some of those delicious peaches. Scones are one of the fastest dishes to make, just combine the dry ingredients, add some butter and buttermilk, then fold in the peaches and chocolate. They bake for less than 15 minutes, so you can have your breakfast ready in under half an hour. If you would rather sleep a few extra minutes, just make the dough over the weekend or after school and bake it as you need it; the dough will probably last about four days in the refrigerator. These peach scones are a delicious way to start the day, and you'll never want to skip breakfast again! White Chocolate Peach Scones 5

Ingredients: 2 Cups Flour 1/3 Cup Dark Brown Sugar 1 T Baking Powder 1/2 tsp Salt 1/4 tsp Cinnamon 1/8 tsp Nutmeg Pinch Ginger 1 Stick Butter, Chilled & Cubed 3/4 Cup + 2 T Buttermilk 2 Peaches, Diced (1 1/2 Cups) 2/3 Cup White Chocolate Chips

Heat oven to 375F. Line a cookie tray with parchment.

Combine the flour, brown sugar, baking powder, salt, cinnamon, nutmeg, and ginger. Toss 2T of the mixture with the peaches. Set aside. Cut the butter into the flour, then add the buttermilk. Fold in the peaches mix and white chocolate.

Scoop the dough onto the prepared tray and bake for 12 minutes or until golden and cooked through.

Makes 12, Recipe Adapted from sweetpeasandsaffron

For more delicious recipes by our Teen Chef, Kayla, check out her blog, The Nerdy Chef!

Easiest Salad Recipe Ever

All, EXTRAS, RECIPESKim & Chloe13 Comments

easy salad I am a foodie.

I know this sounds absolutely crazy, but if I had the option to own a super fancy purse or go out to eat for the next month, then I would probably choose to go out to eat. Call me insane, ‘cause I know it’s true.

However, I used to only really eat food that tasted good (i.e., unhealthy food). But wait, you say. Why does unhealthy food have to be the only food that tastes good? Well, you’re right. I used to think that unhealthy food was the only thing that actually tasted good. But guess what? I was wrong. Very wrong.

I have decided to go on a heathy streak and my Mom is SO happy... but we’ll see how long it actually lasts. This past week, I went to my Aunt and Uncle’s house and my Aunt and I made a her salad recipe together. This was no ordinary salad with tons of lettuce and croutons and all that "junk". It was a surprisingly delicious salad. Like I went out yesterday to the grocery store - by myself I might add - to buy all the ingredients.

This salad is the perfect mix of all things healthy, but it tastes like it could be a guilty pleasure. We’ll call it the “(not so) guilty pleasure salad.” That has a nice ring to it. ;)

But you can also call it the easiest salad recipe ever because not only does it taste great, but it’s SIMPLE to make! All you do is chop and dump.

Directions:

1. Chop cherry tomatoes, red and/or yellow peppers, and cucumbers. 2. Sprinkle some black olives and feta cheese on top. 3. Splash some olive oil and you’re donezo.

It’s that easy!

If you make this salad, be sure to tweet us or instagram us a picture! We promise you’ll love it!

xox, Chloe

Chocolate Truffles {they're easy!}

EXTRAS, RECIPESKim & Chloe4 Comments
Truffles-11.jpg

I'm a chocolate-aholic and chocolate truffles satisfy my sweet tooth like no other chocolate dessert is able. In fact, chocolate for me right up there with crusty french bread, shoes, and family (not always in that order). I remember going to camp my very first time to Camp Skyline and finding out that there was a person who didn't like chocolate. I was dumbfounded. How was this possible? I later learned other people didn't like chocolate and the world was forever a mystery to me. What's more amazing is that 2 members of my family would choose vanilla over chocolate. The horror! At least I have one child after my own heart :lol: .... Anyway, Kayla is back again with another extraordinary recipe that she gave me a while ago to publish, but I tucked it away for a day when I was absolutely craving chocolate so badly that all that would subside this absolute hunger would be rich, thick as sin, chocolate truffles. Chocolate lovers know what I mean. All you non-chocolate-aholics are missing out on a bit of heaven. And I envy your restraint....

chocolate truffles

From Kara, our teen chef: I love chocolate, and ubiquitous treats are chocolate truffles: rich, fudgy chocolate encased in even more chocolate. Instead of splurging on a box from an expensive store, try making your own! They are so easy and a bit messy, which is just another way to say that you get to eat more chocolate. You can stick with the basic recipe, or experiment with flavors by using different chocolates, extracts, nuts, or other add-ins. My favorite chocolate truffles include peppermint extract, peanuts, white chocolate, and dried cherries. Almost anything works in the recipe, but I have found that jams and jellies prevent the filling from setting correctly.

Chocolate Truffles, makes approximately 8 truffles, adapted from Alton Brown

5 oz Chocolate, Chopped 1 Cup Chocolate 1.5 T Butter 1/4 Cup Cream 1 T Corn Syrup Add-Ins

Melt the butter and 5oz chocolate in a glass bowl in the microwave.

In a small saucepan over medium heat, combine the cream and corn syrup until simmering. Pour over the chocolate mixture and let stand for two minutes. Stir to combine, then fold in any add-ins. Chill for an hour or until fudgy.

Scoop the chilled ganache into small balls. Freeze until hard.

Melt the remaining cup of chocolate. Dip the frozen balls into the chocolate, then chill until hard. Share or indulge in your simple homemade chocolate truffles!

For more delicious recipes by our Teen Chef, Kayla, check out her blog, The Nerdy Chef!

Raspberry Coffee Cake recipe

All, EXTRAS, RECIPESKim & Chloe6 Comments
Chocolate-Raspberry-Coffee-Cake-4.jpg

coffee cake recipes From our teen chef, Kayla of The Nerdy Chef:  Making this Raspberry Coffee Cake is one of my favorite things to do for my mom on Mother's Day is to cook her breakfast. She loves raspberries, she loves almonds, and she definitely loves chocolate, so this is one of her favorite treats. You can make it for breakfast or brunch then have some later in the day as a snack or dessert because coffee cake is great at any time of day. Plus, this raspberry coffee cake recipe is perfect for just about any occasion; it is colorful, sweet, rich, and just plain delicious.

The base is a light, fluffy vanilla cake, which is studded with melty chocolate and raspberries. You can use either fresh or frozen raspberries, but, since it's not quite raspberry season yet, I used frozen. They can get pretty liquidy, so I toss them in some cornstarch so that they don't turn the whole cake pink. That would be pretty, but I love the contrast between the cream-colored cake, the dark chocolate, and the bright red raspberries. Anyway, I top the whole thing with buttery almond streusel. It's the same streusel that I use in my Peach Crumb Cake, but, instead of cinnamon, I use almond extract and mix in some almonds. They add even more crunchiness and balance out the sweetness of the cake, the bitterness of the chocolate, and the tartness of the raspberries. This cake is a must-have for brunch, dessert, or just a snack because there are so many different textures and delicious layers of flavors.


coffee cake recipes


Makes 1 9" Square, Recipe Adapted from Sally's Baking Addiction

3/4 + 1/3 Cup Sugar 1/3 Cup Dark Brown Sugar 1/2 + 1/8 tsp Salt 1 Stick Butter, Melted 1/2 Stick Butter, Softened 1/8 tsp Almond Extract 1 3/4 Cups Cake Flour 2 Cups Flour 1/2 Cup + 2 T Slivered Almonds 1 Cup Milk 1 tsp Vanilla 2 tsp Baking Powder 1 Egg 3/4 Cup Chocolate Chips 1 Cup Raspberries (Fresh or Frozen & Thawed) 2 T Cornstarch

Whisk together 1/3 cup sugar, brown sugar, 1/8 tsp salt, melted butter, and almond extract. Stir in cake flour and almonds. Chill until cold.

Line a 9" square baking pan with parchment. Heat oven to 350F.

Beat the softened butter and remaining sugar together until fluffy. Add the egg and vanilla.

Whisk the flour, salt, and baking powder together. Fold the flour mixture into the batter in three additions, alternating with the milk in two additions.

Combine the raspberries and cornstarch.

Pour 2/3 of the batter into the prepared pan. Sprinkle with half the raspberries and chocolate, then top with the remaining batter. Sprinkle the remaining raspberries and chocolate on top, and top with the streusel.

Bake the coffee cake for 45 minutes or until cooked through.

For more delicious recipes by our Teen Chef, Kayla, check out her blog, The Nerdy Chef!


Raspberry Coffee Cake
Recipe Type: coffee cake
Cuisine: American
Author: popcosmo.com
Coffee cake perfect for any occasion. The base is a light, fluffy vanilla cake, and is studded with melty chocolate and raspberries.
Ingredients
  • 3/4 + 1/3 Cup Sugar
  • 1/3 Cup Dark Brown Sugar
  • 1/2 + 1/8 tsp Salt
  • 1 Stick Butter, Melted
  • 1/2 Stick Butter, Softened
  • 1/8 tsp Almond Extract
  • 1 3/4 Cups Cake Flour
  • 2 Cups Flour
  • 1/2 Cup + 2 T Slivered Almonds
  • 1 Cup Milk
  • 1 tsp Vanilla
  • 2 tsp Baking Powder
  • 1 Egg
  • 3/4 Cup Chocolate Chips
  • 1 Cup Raspberries (Fresh or Frozen & Thawed)
  • 2 T Cornstarch
Instructions
  1. Whisk together 1/3 cup sugar, brown sugar, 1/8 tsp salt, melted butter, and almond extract. Stir in cake flour and almonds. Chill until cold.
  2. Line a 9" square baking pan with parchment. Heat oven to 350F.
  3. Beat the softened butter and remaining sugar together until fluffy. Add the egg and vanilla.
  4. Whisk the flour, salt, and baking powder together. Fold the flour mixture into the batter in three additions, alternating with the milk in two additions.
  5. Combine the raspberries and cornstarch.
  6. Pour 2/3 of the batter into the prepared pan. Sprinkle with half the raspberries and chocolate, then top with the remaining batter. Sprinkle the remaining raspberries and chocolate on top, and top with the streusel.
  7. Bake the coffee cake for 45 minutes or until cooked through.

Happy early Mother's Day!!

Easter Bread

EXTRAS, RECIPESKim & Chloe18 Comments

egg bread


Some of you may remember my Easter bread recipe from last year. Everyone loved it so much that I made it again, and it's even better now! I added a glaze to make it a bit sweeter and also played around with the colors of the eggs in the middle.

For years my family and I would dye Easter eggs even though we aren't Christian and don't celebrate Easter. I just loved it so much that I forced my parents into buying all the kits to dye eggs and I would spend hours making tons of them. I stopped a few years ago, but then I figured out how to make my own dyes for this bread. It's so easy; all you have to do is stir some vinegar and food coloring into boiling water. If you put stickers on before you dip the eggs and peel them off after, you are left with white spots (or whatever shape your stickers are). I decided to try to tie-dye mine, and it was actually pretty easy to do. I dyed the water the color I wanted and let the eggs sit for a few minutes, and then I splashed a few drops of pure food coloring on an egg before submerging it again for just a few seconds. Let the eggs sit for a few seconds, blot dry, and you have beautifully tie-dyed eggs.

As good as the bread is and as pretty as the eggs are, I must say they could use a little more sweetness. Instead of adding more sugar and potentially upsetting the delicate balance of the bread itself, I decided to drizzle the whole thing with a glaze. I prefer vanilla, but you can add whatever flavor you want, from citrus (use the zest) to almond (use almond extract). For more flavor, you can even mix in some dried or candied fruit like orange peel, raisins, or cherries. Even if you keep the bread plain, it will definitely be the star of your Easter brunch! ~Kayla of The Nerdy Chef.

easter bread with hardboiled eggs

recipe for easter bread

easter bread

Easter Bread Recipe , makes 6

2 1/4 tsp Yeast 1 1/4 Cups + 1 tsp Milk Pinch Salt 1/3 Cup Butter 9 Eggs 1/2 Cup Sugar 5 Cups Flour Vinegar Food Coloring Sprinkles 1/2 Cup Powdered Sugar 1 tsp Milk 1/8 tsp Vanilla Extract (or other type of extract or zest)

Boil 1/2 cup water in a mug or glass measuring cup. Whisk in 1 tsp vinegar and food coloring. Gently place an egg in the mixture and swirl lightly for up to 5 minutes or until desired color. Repeat with 5 more eggs, changing water when necessary or when changing colors.

Combine the butter and 1 1/4 cups milk in a small pot until the butter is melted. Cool until just warm.

Combine the yeast, salt, 2 eggs, and sugar in the bowl of a stand mixer. Fold in the milk mixture, then beat in half of the flour using the dough hook. Gradually add the remaining flour to form a stiff dough; you may not use all of it. Knead until smooth.

Place the dough into a greased bowl and cover. Let rise in a warm, draft-free area for an hour or until doubled. Punch down the dough and divide into 12 pieces. Roll each into a 1" thick log. Twist two ropes together, then form it into a ring. Repeat with remaining dough.

Place the rings on parchment-lined cookie trays. Place an egg in the center of each; it should be fairly snug. Cover and let rise for another hour.

Preheat oven to 350F. Beat the remaining egg with 1T water. Brush onto the rings, avoiding the egg in the center. Bake for 20 minutes or until golden and cooked through.

Whisk the powdered sugar, remaining milk, and vanilla together until smooth. Drizzle onto the cooled bread and top with sprinkles. Enjoy your Easter Bread!


Easter Bread
Author: Kayla for PopCosmo
Serves: 12+
The traditional colorful, braided Easter bread with a hard-boiled egg in the middle.
Ingredients
  • 2 1/4 tsp Yeast
  • 1 1/4 Cups + 1 tsp Milk
  • Pinch Salt
  • 1/3 Cup Butter
  • 9 Eggs
  • 1/2 Cup Sugar
  • 5 Cups Flour
  • Vinegar
  • Food Coloring
  • Sprinkles
  • 1/2 Cup Powdered Sugar
  • 1 tsp Milk
  • 1/8 tsp Vanilla Extract (or other type of extract or zest)
Instructions
  1. Boil 1/2 cup water in a mug or glass measuring cup. Whisk in 1 tsp vinegar and food coloring. Gently place an egg in the mixture and swirl lightly for up to 5 minutes or until desired color. Repeat with 5 more eggs, changing water when necessary or when changing colors.
  2. Combine the butter and 1 1/4 cups milk in a small pot until the butter is melted. Cool until just warm.
  3. Combine the yeast, salt, 2 eggs, and sugar in the bowl of a stand mixer. Fold in the milk mixture, then beat in half of the flour using the dough hook. Gradually add the remaining flour to form a stiff dough; you may not use all of it. Knead until smooth.
  4. Place the dough into a greased bowl and cover. Let rise in a warm, draft-free area for an hour or until doubled. Punch down the dough and divide into 12 pieces. Roll each into a 1" thick log. Twist two ropes together, then form it into a ring. Repeat with remaining dough.
  5. Place the rings on parchment-lined cookie trays. Place an egg in the center of each; it should be fairly snug. Cover and let rise for another hour.
  6. Preheat oven to 350F. Beat the remaining egg with 1T water. Brush onto the rings, avoiding the egg in the center. Bake for 20 minutes or until golden and cooked through.
  7. Whisk the powdered sugar, remaining milk, and vanilla together until smooth. Drizzle onto the cooled bread and top with sprinkles.


Croque Poulet: Chicken Sandwich Recipe

EXTRAS, RECIPESKim & ChloeComment

Our teen chef, Kayla, from The Nerdy Chef, created a chicken sandwich recipe inspired by her love of a sandwich she tasted and her love of a hot soup and sandwich in winter. She'll be bringing you more soups soon.  I created this chicken sandwich recipe after eating a sandwich in a French restaurant, hence the French name (I'm not sure what a croque means, but poulet is chicken).* I loved the combination of gooey cheese, chicken flavored with Herbes de Provence, and salty, crispy bacon all piled on buttery toasted bread. Of course, I had to put my own spin on it, so I changed the cheese and the seasoning of the chicken. The original sandwich had Swiss cheese, but I prefer Provolone. It melts really well and the mild flavor complements the other components. However, you can use any good melting cheese like cheddar, american, or Swiss. The second change is the chicken. If you're running short on time, you can slice up a rotisserie chicken from your grocery store. If I have the time to cook, though, I found something incredibly easy and incredibly tasty. After I cook the bacon, I leave the fat in the skillet and cook the chicken in it. Yes, I take pieces of chicken and saute it in bacon fat. It absorbs all the flavors of the bacon and stays unbelievably juicy. Again, you can always use store-bought chicken, but this method adds another layer of flavor. If you do buy the chicken already cooked, just skip the marinating and chicken-cooking steps. Either way, you will love this chicken sandwich recipe! chicken sandwich recipe

1 lb Boneless Skinless Chicken Breasts 8 Slices Bread 3 T Butter 8 Strips Bacon 8 Slices Cheese 2 Cups Buttermilk

Trim the chicken breasts and season with salt and pepper. Marinate in the buttermilk overnight.

Cook the bacon to the desired crispiness. Heat a grill and pat the chicken dry. Grill the chicken until cooked through. Slice into 1/4" thick slices. (If using rotisserie chicken, skip these steps.)

Lay a slice of cheese on each piece of bread. Top half of them with two strips of bacon each and equal portions of the chicken. Lay the other slices of bread on top.

Heat some of the butter in a grill pan or panini press. Cook the sandwiches until browned and cheese is melted.

Makes 4 Sandwiches

*Editor's note: croque in the instance and with a croque-monsieur translates to "crispy" or "crunchy" since the sandwich typically is! 

For more delicious recipes by our Teen Chef, Kayla, check out her blog, The Nerdy Chef!


Chocolate Truffle Mini Tarts

EXTRAS, RECIPESKim & Chloe3 Comments

Our teen chef, Kayla, from The Nerdy Chef, is here to help us with an amazing Valentine's Day Chocolate Truffle recipe: I am addicted to these tarts. I absolutely love chocolate, and this has three types (four if you include the decoration): the crust, the filling, and the ganache. I start with my basic pie crust recipe, substituting cocoa powder for part of the flour. After I bake the crust, I make a delicious fudgy filling. It is creamy and velvety with just enough sweetness to complement the slight bitterness of the chocolate. To top it all off, I make a basic chocolate ganache. For Valentine's Day, I like to make white chocolate hearts as a garnish. When the occasion does not call for hearts, you can either leave the tarts plain or experiment with other decorations. All you do is melt some white chocolate and drizzle it in whatever shape or pattern you want. It is the perfect topping for the perfect dessert and a twist on a regular Chocolate Truffle recipe to make it special for a special holiday! chocolate truffle recipe

1 Recipe Chocolate Pie Crust (See Below) 1 1/4 Cups + 2 T Cream 11 oz Chocolate Chips 2 Eggs 1 tsp Vanilla 1/4 tsp Salt 1 tsp Corn Syrup

Heat oven to 350F.

Bring 1 1/4 cups cream to a boil, then pour over 9oz chocolate. Whisk until combined, then add the eggs, vanilla, and salt.

Pour the chocolate mixture into the crust and bake until mostly set, 25 minutes. Chill.

Boil the remaining cream. Remove from heat and whisk in the remaining chocolate. Stir in the corn syrup and 1T warm water. Pour onto the cold tart and chill until set, about 3 hours.

Chocolate Pie Crust

1 Cup Flour 1/4 Cup Cocoa Powder 1/4 Cup Sugar 1/4 tsp Salt 1 Stick Butter, Chilled 1 Egg Yolk

Pulse the flour, sugar, and salt in a food processor until combined. Add the butter and pulse until small pieces remain. Combine the egg yolk with a tablespoon of cold water and add in. Pulse until it begins to form a ball, adding more water as necessary. Chill.

Preheat oven to 375F. Grease 10 4" tartlet pans or 1 9-11" tart pan.

Roll the dough out to fit the pan(s). Grease a sheet of foil, then press onto the dough. Fill with pie weights and bake until firm, 10 minutes for tartlets and 20 minutes for a tart. Remove foil and weights; cool.

Makes 10 Tarts or 1 9-11" Tart, Recipe Adapted from www.hummingbirdhigh.com and Bon Appetit

For more delicious recipes by our Teen Chef, Kayla, check out her blog, The Nerdy Chef!