DIY Bow Bracelet

DIY bow bracelet
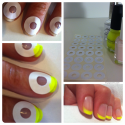
My brother has an absolute obsession with bow ties. In fact, he won’t even wear a regular tie anymore. Even though our styles are anything but similar, since I’m all prep and he’s punky prep, we do share a love for bow ties. Although I would never wear a bow tie, I adore them on him and started thinking how could I wear them, instead of just sporting them as a design on a sweater or in my hair.My mom spotted this MAC ad and we we had our answer: a bow bracelet.

bow bracelet
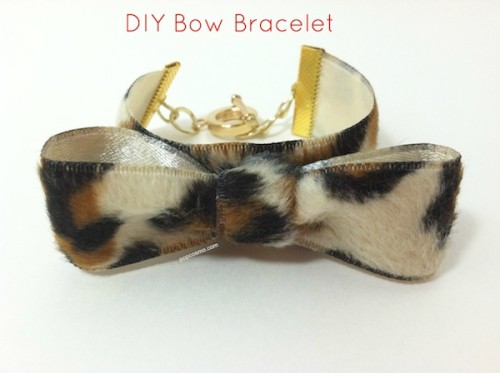
We saw a cute DIY here and fancy-schmancy ones at Kiel James Patrick ($58)… but we’re pretty proud of how cute ours turned out! And they cost loads less and are practically fool-proof to make. The hardest part? Deciding what ribbon to use!

Step 1: Gather supplies. You will need pliers, ribbons of various lengths (as you can see, mine are cut in approximate lengths!), chain, crimps, scissors, a glue gun (or fabric glue) and a ruler. You will also need a fastener. (Sorry, I forgot to take a photo of it!) I ordered my crimps from Etsy and got a “grab bag” of various sizes since I wanted to make a few bracelets. If you know exactly what size ribbon you will be using, you could order just that size crimp since they are very affordable.

how to make bow bracelets
Step 2: Make your bow. It’s easy… just make a circle with the 7″ ribbon and glue the ends (pic. 1). Then pinch and glue the middle (pic. 2). Finally, use the small 2″ piece to wrap around the middle and glue it in place (pic. 3). Voilà, your bow!

For our pink and green bow, we made a double bow. (Not to be confused with a double rainbow, haha.) I used the 6″ and 7″ ribbons to make circles (as in pic. 1) and then glued each of them in the middle (as in pic. 2). Then I placed them on top of each other and wrapped the 2″ piece around the middle (as in pic. 3). It’s exactly the same as below, but with an extra 6″ bow on top!

how to make bow bracelets
Step 3: After you have your bows, add the crimps to the 5″ ribbon by gently applying pressure with the pliers. Then attach a few links of chain to each crimp, depending on how tight you want your bracelet to be. Surprisingly, the bracelet is balanced and won’t turn much even if loose. You might even decide, based on the size of your wrist, that you want your 5″ ribbon to be cut down to 4-1/2″. My wrist is medium, but my mom’s wrist is tiny, so we varied ours. With a 5″ ribbon, we only needed 1 or 2 links on each side of the bracelet. It will also depend on your fastener, so wrap it around your wrist to size it before you begin! Attach the links and the fastener and you are done. The entire project should take less than 30 minutes!

Single Bow:
bow bracelet

Double Bow:
DIY bow bracelet

Tag us on Instagram (@popcosmo) and let us see what ribbons you choose and a photo of you wearing your DIY bow bracelet!

Linked up at: The NY Melrose Family, Ginger Snap Crafts, DIY by Design


Share to Facebook Share to Twitter Pin It More...

DIY Boot Trees

These DIY boot trees are simple, fast and colorful. Plus, necessary if you have tall boots. If you follow me on Twitter, you know I’d been looking for boots forever! I finally found the perfect pair and enjoy the ease of knowing what to wear with practically every outfit. It’s amazing how a simple pair of tall leather boots can dress up a pair of jeans and make you stand a bit taller. They were worth the wait.

But the one thing I had forgotten about boots was that once they are out of the box… they flop. They don’t stand up straight and they just made my newly organized closet look downright sloppy and floppy.

I knew I needed boot trees, but I also didn’t want to invest any more money in my perfect boots (I have to be the only person who did not buy my post Christmas boots on sale). So, a fast, easy and cheap DIY was needed. And our easy-to-make boot trees definitely fulfill all 3 requirements. Customize yours with any colors and send us a photo!

boot trees

Step 1: Gather your supplies

boot trees

Step 2: Knot toe of sock, and insert a few handfuls of beans.

Step 3: Place empty water bottle in sock with top of bottle at the foot of the sock.

Step 4: Tie ribbon at top.

handmade boot tree

Step 5: Insert in boot.

DIY boot trees

boot trees

Enjoy your custom color boot trees.

Share to Facebook Share to Twitter Pin It More...

Super-easy DIY bangle

The holidays are over, the boxes are opened, the gifts are all being enjoyed. But if your house is like ours, there are tons of leftover wrapping paper. And we hate leftovers! What to do with it? We decided to use some scraps we had to create a new bracelet for our DIY jewelry obsession. We upcycled wrapping paper into a cute DIY bangle that turned out pretty well… so much so that we will be making a few more. Let us know what you think!

easy bangle bracelet project

Step 1: Gather your supplies: scissors, modge podge, wrapping paper or decorative paper, ruler, paintbrush or sponge brush and a plain wooden bangle. We ordered ours from DIYBangles.com.

DIY bangle

Step 2: Measure the width of the bangle and cut double the width of the paper (to cover the outside and inside) plus the length.

Step 3: Cover the bangle in modge podge.

Step 4: Apply the paper to the bangle making sure the overlap is on the inside of the bangle. Apply a layer of modge podge to the outside of the bangle as a protective layer.

Step 5: Your bracelet will look like a white gooey mess. Don’t worry, since it will dry clear. We used tinfoil to keep from making a mess!

DIY bangle bracelet

Step 6: After letting dry, enjoy your easy DIY bangle!

easy bangle bracelet project

How about you… do you have any holiday leftovers?

Share to Facebook Share to Twitter Pin It More...