
One of our favorite summer projects is tie-dying and as much as we love tie-dye, you know we like to keep it simple... which is why we are such huge fans of Tulip One-Step Tie-Dyes and have been using them for years for all of our projects (see tie-dye shorts and tie-dye beach sheet). We were ready to jump on the Tie Dye Your Summer bandwagon and once again turned to Tulip because they come with bottles that you simply fill with water and you're ready to go. Even gloves come in the box, plus some ideas. All you need is something to tie-dye and a cool idea!

Striped T-Shirt Tie Dye Prep
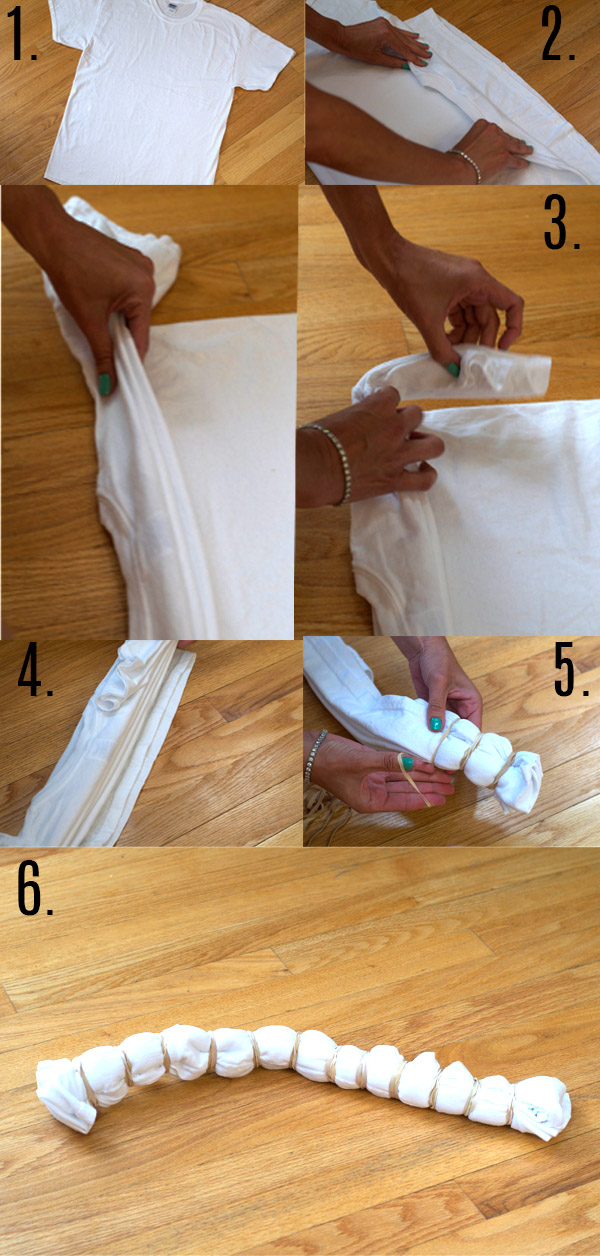 1. lay t-shirt flat and get rid of wrinkles
2. pleat the shirt from top to bottom (you can fold it in the middle if it's easier to handle it)
3. fold sleeves in last, pleating them as well, and tucking them under
4. you should have a flat pleated shirt
5. wrap rubber bands around at intervals, making sure the pleats stay intact
6. your t-shirt should look like a centipede when ready to tie-dye
1. lay t-shirt flat and get rid of wrinkles
2. pleat the shirt from top to bottom (you can fold it in the middle if it's easier to handle it)
3. fold sleeves in last, pleating them as well, and tucking them under
4. you should have a flat pleated shirt
5. wrap rubber bands around at intervals, making sure the pleats stay intact
6. your t-shirt should look like a centipede when ready to tie-dye
Dotty T-Shirt Tie Dye Prep
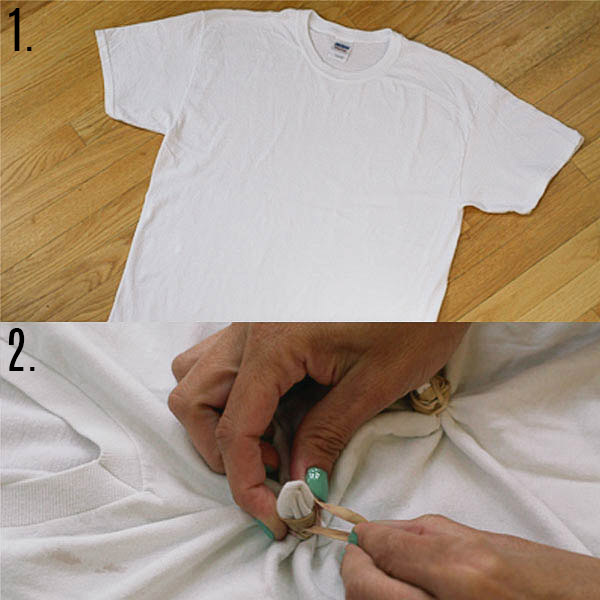 1. lay t-shirt flat
2. pinch sections of the t-shirt and wrap the rubber band tightly around. The larger the piece sticking out the top, the larger your circles will be and the more rubber bands you use, the bigger your white space around the circle will be. You could pinch both front and back, but we pinched the front and back together (i.e., the back of the shirt was in the rubber bands you see) and it looked fantastic while saved a bunch of steps.
1. lay t-shirt flat
2. pinch sections of the t-shirt and wrap the rubber band tightly around. The larger the piece sticking out the top, the larger your circles will be and the more rubber bands you use, the bigger your white space around the circle will be. You could pinch both front and back, but we pinched the front and back together (i.e., the back of the shirt was in the rubber bands you see) and it looked fantastic while saved a bunch of steps.
Once you have your shirt(s) ready, wet them thoroughly. You could definitely do this step first, but we found it was easier to work with dry shirts.

Gather the tie-dye supplies - most of which will be in your Tulip One-Step Tie-dye kit + protection for whatever area you will be tie-dying in. We suggest tie-dying in the grass, if you can, since the area will be stained.

Add water to the color bottles you choose and you are ready to tie-dye! It couldn't be more simple, then add color to your shirts directly from the bottle.

Once the color has been applied, place them in a bag for 6 or more hours (we left ours in the bag overnight) because we're lazy like that.

Remove the shirts from the bags and rinse them in cold water until the water runs clear. It takes a while, but once the color is out, it's gone and your tee is colorfast. Follow the instructions for washing and drying and then enjoy your new shirts.


Voilà, one old tee that was stained turned into a new tee that looks amazingly cool and a new tee that looks much better than plain white! We might cut the neckline on the blue tie-dye t-shirt, but we really love how it turned out.
Follow I Love To Create for some fab & fun creative inspiration on Facebook, Twitter, Pinterest and their Blog. Perfect boredom busters! Get creating!
What are you thinking about tie-dying?
xo ~kim & chloe
Thank you ILTC and Blueprint Social for sponsoring this post. All opinions are our own, as usual!