Popcosmo

RECIPES

Keurig Makes Life More Romantic

RECIPES, College, EXTRASChloe Gordon1 Comment

You know those pictures that show the contents of people’s bags organized in a perfect manner. The lines between each object are unbelievably straight, not one object looks out of place, and everything just flows? You know the ones, right? 

If not click here here or here

The way these pictures make me feel is the exact same way drinking coffee makes me feel. You know what I mean. Just like totally put together and with it. Obviously, I probably don’t look put together and with it, but they always said it’s what’s on the inside that counts the most. 

Coffee just has super powers, I swear. I don’t know what it is but there’s something about coffee that just makes me feel great. It’s probably the caffeine, but we’ll call it magic

Keurig sent me a ton of k-cups to sample, and lemme tell you, receiving the box made me weak in the knees.

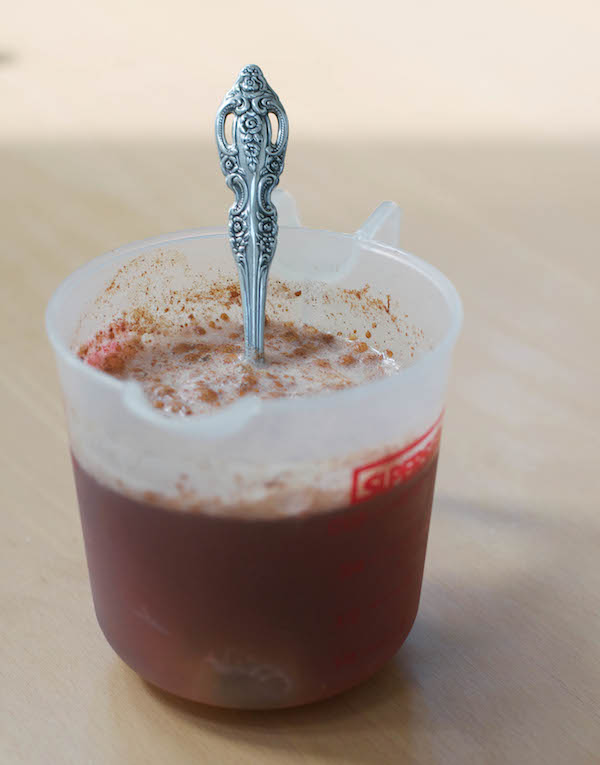
Obviously, the first one I had to try was the Maple Cream one. With words on the box including “no milk or sugar needed” and “sweet and creamy” it was a no brainer. It’s a little too hot in Florida to drink hot coffee, so I decided to get minimally creative and freeze the coffee into ice cubes and then put the ice cubes into a cup of regular coffee.

I’m trying to stay humble, but this idea might be my breakthrough to finally becoming a member of Mensa. 

Basically, it’s like having two cups of coffee in one, iced, and no sugar or milk needed. 

When I go back to college, you can bet your bottom dollar that I’m going to be filling my freezer with coffee filled ice cube trays. If you're going to college for the first time, going back to college, or living at all, you NEED a Keurig in your life. It makes life better, easier, and more romantic, honestly. 

Thanks for reading! 
xox
chloe 

kale, avocado, grapefruit dip

RECIPESChloe Gordon2 Comments
grapefruit guac

I’ve mentioned this before, but I’m a self diagnosed foodie. When given the option between working out or going out for a nice big breakfast/brunch/lunch/dinner/coffee date. I will always choose food. Even if I’ve already committed myself to a nice long workout. Food always wins. It’s inevitable. 

Anyway, I have a favorite restaurant. It seems a little silly to fully commit myself to one restaurant when there are so many out there that I have yet to try, but True Food is my restaurant soul mate. My true love. My one and only. I just know. You know? 

So anyway, my friend and I went to True Food for dinner the other night and there was a new appetizer on the menu. It had a cute name, but it was basically kale, avocado, grapefruit dip and it was amazing. So good. Like mouthwatering good. As soon as I got home after dinner I looked up the recipe because I needed to have this dip sitting in my fridge waiting for me at all times. It was seriously the best thing ever, no exaggeration. 

So I found the recipe online, thanks to the amazing invention that is Google. And I made it, like the professional chef that I am. Obviously, it wasn’t as good as the real thing, but it was (and is) still super yummy. I totally recommend making it so you can impress your tastebuds, friends, parents, co-workers, or anyone really. Just serve with some tortilla chips or the healthier flax seed cracker option and you’re good to go. 

mexican dip
kale, avocado, grapefruit dip

I found the recipe from Well ATL

So if you end up making this recipe please let me know how you (or your friends) like it! 
Thanks for reading! 
xox
chloe

diy s'mores pops

RECIPESChloe Gordon1 Comment

There is a constant, agonizing battle between my brain and my stomach. My brain so desperately wants to be healthy/fit/lean but my stomach constantly craves carbs/dairy/sweets. It’s an endless struggle. Even though I hopelessly want my brain to be the winner of all internal duels, my stomach usually ends up winning. Ice cream after a long day at the pool? Absolutely. Eating a big brunch with friends instead of making it to the 11am spin class? You betcha. Skipping the s’mores dessert because “I shouldn’t?” Not happening, give me all the s’mores. 

That being said, my cousin recently had her bat mitzvah and at her party they were passing around these cute little s’more pops. They were basically a marshmallow dipped in chocolate and then dipped in graham cracker on a stick. I had one and I was hooked. I needed to eat every single one of them. Imagining them throwing the extra pops away left me feeling light headed and a little sweaty. I probably ate nine or ten, give or take, and could’ve easily eaten way s’more. (hehe couldn’t resist the pun)

Now that I’m home, these pops have been consuming my thoughts. They’re seriously all I can think about. I told my mom about the conundrum that I was facing and she suggested that I make my own. I know my mom is a smart woman, but I didn't know she was that smart. Of course I should make my own. It would be easy, cheap, and allow my stomach an endless source of happiness… forget my brain. 

s'mores pops
marshmallows
chocolate
grahamcrackers
melting chocolate
smores pops diy
diy summer smokes pops

So if your stomach is anything like mine, you should most definitely make these for yourself. You won’t regret it, I promise. 

Ingredients for the S’more Pops: 
Graham Crackers
Dark Chocolate
Marshmallows
Sticks (to stick the marshmallows on)

Instructions:
-First start by crushing your graham crackers. The smaller the crumbs the better. I just put the big pieces in a plastic bag and crushed them up with my hands. It should look like a sand-like consistency 
-Second, put your marshmallows on the stick. The stick should be right at the top of your marshmallow but not all the way through. 
-Third, melt your chocolate. I used a small bowl and put it on top of a boiling cup of water. This kept the chocolate melted and kept it from burning while I dipped the previous marshmallows. 
-Fourth, dip your marshmallow into the chocolate. Let the extra drip off before moving on to the next step.
-Fifth, dip your chocolate covered marshmallow in the bowl of crushed graham cracker. 
-Sixth, place your coated and covered marshmallow on a plate and once the plate is full, stick it in the fridge for a little while. 
-Seven, eat! Aka, the best step. 

And there you have it. A perfect summer treat. Let me know if you end up making them! 
xox
Chloe 

Energy Bites

DIY, EXTRAS, RECIPESKim & Chloe2 Comments

So, before I get into the real post, I just want to mention that a ton of people found out about my blog at school. It seemed like all of a sudden people were mentioning that they liked my blog or had seen my blog, and it was kind of weird at first. It’s not that I didn’t want people at school to know that I have an “internet life,” it’s just that it felt kind of separate. I’m not any different on my blog than I am in real life, but I do think of my blogging self as a whole different part of me. Anyway, I guess what I’m trying to say is that if you have a hobby or extracurricular activity that you’re passionate about, don’t worry if people find out about it. It’s who you are and it’s a part of you, regardless of what other people think about it. And, if you happen to be from school and you’re reading this… lemme know (;Ok, sorry, moving on to the real post now...

One of my friends from school brought some peanut butter balls to swim practice and she let me have one. Not only was it absolutely amazingly tasty, but it was the perfect snack to have right before a workout. She told me that she found the recipe on Pinterest so I did some digging and found it myself. I didn’t have all of the ingredients on hand so I kind of changed it around a little bit and I happened to really like the way they turned out! Here’s what I did, but if you want the real recipe to make these energy bites, click here.

Ingredients:

1 cup of dry oatmeal (old-fashioned oats) 3/4 peanut butter (I tried almond butter, but it wasn’t sticky enough) 1/2 cup chocolate chips 1/3 cup honey 2 table spoons chia seeds 1 teaspoon vanilla extract

Directions:

1. Pour everything in a bowl and mix it together. I found that using my hands to mix was much easer than using a spoon or whisk. 2. Put the mixed bowl into the fridge for at least half an hour 3. Roll into balls about 1” in diameter (or however big/small you want them)

Seriously, that’s it. These energy bites are so simple to make and so easy too! If you make them be sure to post a picture on Instagram or Twitter and tag us so I can see!

xox, Chloe

Starbuck's Pumpkin Spice Latte Recipe Hack: Taste Test

EXTRAS, RECIPESKim & Chloe7 Comments

It's that time of year again: leaves are falling, sweaters are being pulled out of hiding, a fire or two has already been lit, and we are craving a Starbuck's Pumpkin Spice Latte (or PSL, as it's affectionately known). But hearing how it's mostly syrup and has a whopping calorie count had us ready to make our own in our brand new Keurig 2.0 we were recently sent by the sweet Keurig folks. But finding a zillion Starbuck's Pumpkin Spice Latte recipe ideas already out there, Chloe and I got smart and decided to put those recipes to our (ahem) expert and very subjective PSL taste test. And the smell of them cooking even lured brother/son out to help us - yes, we had fun!

We scored each recipe on a scale of 1-5, with 1 being the lowest, for ease, cost, availability of ingredients, healthiness. The category for taste comparison to Starbuck's PSL was out of 10 since taste is the most important factor, after all. Once we devised our scoring and gathered our ingredients, we settled in for a hard day's work of sipping lattés... just for you. #WeLoveBlogging  Chloe tasted and tasted and tasted some more!

52 Kitchen Adventures SCORE = 19 ease: 5 cost: 4 ingredients: 3 healthiness: 3 taste: 4 Thick, a little chunky, and frothy. Would be better with whipped cream, but the flavor is perfection. Beware, pumpkin sludge might be at the bottom of your cup... a little gross.

The Kitchn SCORE= 21 ease: 4 cost: 2 ingredients: 2 healthiness: 3 taste: 10 We wish the directions were more specific, but the result was beyond amazing. The tastes reminds me of marshmallows on top of a pumpin pie and I would drink this for breakfast, lunch, and dinner.

Eating Bird Food SCORE= 17 ease: 4 cost: 3 ingredients: 2 healthiness: 5 taste: 3 Too bitter but thinness was on point. The flavor is just a little too sharp for me.

The Original Starbucks PSL  SCORE=17 ease: 4 cost: 0 ingredients: 5 healthiness: 0 taste: 8 I know, weird that the original is only an 8. But it is what it is. The original sort of tastes like drinking a hot pumpkin smoothie to me, and now that I've made some at home, I've learned that I like being able to tweak my PSL how I want it.

And the winner was: The Kitchn Pumpkin Spice Latte recipe, and to be honest, it looks like I can save tons of calories and $$ this fall. Thanks to our Keurig 2.0, we can easily make the recipe for 1 or for 10 with the new pod system. Guess whose house is going to be smelling like a Starbucks Pumpkin Spice Latte this fall? My brother is definitely happy!

@popcosmo on Instagram div.fs-entry-container { width: 12.5%; padding-top: 12.5%; }

Homemade Hibiscus Pomegranate Granola

EXTRAS, RECIPESKim & Chloe7 Comments
Onli Homemade Granola

As you might have noticed, we’ve been posting a lot of recipes lately! I don’t know if it’s just that we have a better kitchen in our new house in Denver, or if I’ve just been enjoying making my own food over going out. Whatever it is, I’m loving it. Onli Beverages was nice enough to send me a few drinks to try out and I decided to get creative with it. With my cousin Aly visiting, we made Onli flavored granola. Seriously? Yes, and this homemade granola is beyond delicious.

Ingredients:

2 1/2 cups of oats 1 cup puffed rice 1/4 cup sliced almonds (or other nuts) 6-8 ounces of Onli Hibiscus Pomegranate Aronia 1 egg white 1/2 teaspoon vanilla extract 1-1/2 teaspoons cinnamon 2 tablespoons honey (add more for sweeter granola) 1/4 teaspoon salt

Directions:

Preheat your oven to 350 degrees. Mix the oats, puffed rice, and almonds in a bowl. Mix everything else in another bowl. Then combine the two bowls into one. Stir it all until the liquid is absorbed. (You might need to add more oats or puffed rice to help) Lay all the granola on a cookie sheet covered with parchment paper. Put your granola in the oven for 15 minutes, then stir and put it back in for another 15 minutes. (If you want it to be super crunchy, then you can put it in for longer).

Homemade Granola Ingredients
Homemade Granola
Homemade Granola
Homemade Granola | PopCosmo
Granola Recipe
Granola Recipe
granola
granola
how to make granola | PopCosmo

This should make a batch for about three people so feel free to double or triple the recipe. We ate ours over yogurt and we've learned that we need to keep a constant supply on hand. Onli has a ton of flavors so we definitely want to experiment with the rest of them! If you try this recipe out be sure to tag us (@popcosmo) and @ONLIbeverages in the picture! We might be biased, but we think it's the best homemade granola you'll ever eat!

xox, Chloe